Thursday, March 24, 2011
My Vintage Sewing Machine - Montgomery Ward UHT J1277
I inherited my sewing machine several years ago after my father passed away. While it was not my mother's sewing machine he loved it dearly - he called it his "button sewer". My father was a practical man, I think he bought his machine with two things in mind; one, it is a little power horse and two it can sew buttons on clothes.
To be honest I knew nothing about owning a vintage sewing machine when I brought it home. It needed so much equipment - my dad may have bought a good machine but he didn't buy any of the peripheries - it needed needles, bobbins, bobbin casings, presser feet, cams, and belts. Blarg. Imagine my surprise when I learned that finding Montgomery Ward parts was next to impossible. I was so depressed. Thank the powers that be for my local Bernina dealer "The Sewing Palace."
Believe it or not those ladies know about more than just Bernina sewing machines - they knew that my Montgomery Ward could be repaired using Singer parts and that I could use generic manufactured class 15 metal bobbins, bobbin casings, and belts and Schmetz universal needles and that my machine would be compatible with most low shank presser feet. The only thing they couldn't help me with were cams - cams appear to be machine specific and while I have since found and purchased Montgomery Ward cams that are compatible with my machine I am curious if others will work but hesitant to spend money on them (if you know please tell me).
She sews like a dream, emitting a pleasant little whir as the motor takes on most every fabric I throw at her - including layers of denim and leather - without a stopping. Her one downfall is her satin stitch foot. It drags on the top layer of fabric causing it to pucker and create uneven stitches so I have become an addict of the walking foot I purchased for quilting. I think I will buy one of those Teflon open toed feet to see if it will fix the problem. Until I do the cams go unused - nothing can destroy a decorative stitch faster than uneven feed.
Tuesday, March 22, 2011
Nainsook - A Little Known Treasure
"Cultivate your gift for clothes."
- Paris Frocks at Home
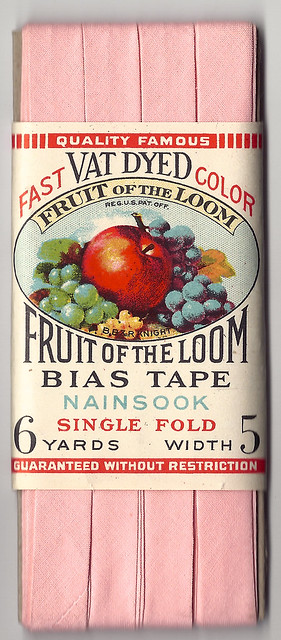
I'm always on the look out for vintage fabrics or reproductions to use in my children's clothing. To be honest using the "real deal" is a big thing to me, weren't these patterns designed with a certain type of fabric in mind. I recently purchased a lovely length of vintage embroidered fabric that the seller listed as batiste, but once it arrived in the mail I quickly realized that I had a real find on my hands. It wasn't batiste at all but a lesser known cousin called Nainsook.
![]() |
| Example of corded nainsook. |
| A rare printed nainsook. |
Nainsook is frequently mistaken for batiste or voile. An easy way to tell the difference between these fabrics is to take a close look at the material, voile is loosely woven generally using rougher threads and batiste is more tightly woven with smoother threads. Cotton voile will have a very slight fuzzy feel while batiste will be smooth. Both are more sheer than nainsook.
For those of us who live in colder climates nainsook might be preferable to batiste because of it's heavier nature. I love the feel and look of the few pieces that are in my stash, they are reserved for girls summer dresses and layette sets.
Thursday, March 3, 2011
How to List Your Vintage Patterns
| Simplicity 9843 |
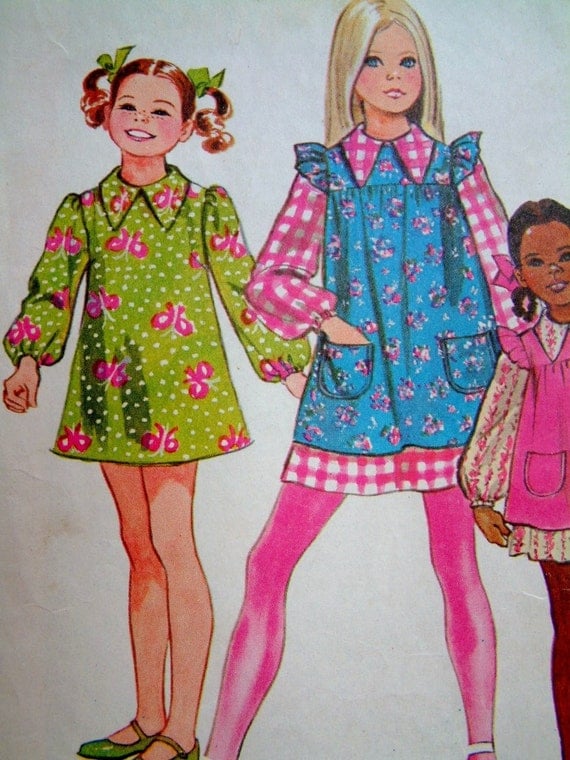
This is how you list to get buyers into your shop and to the listing they really want. List the manufacturer, pattern #, description from the envelope (please don't make up your own), size (actual size not descriptive word like toddler, girls, boys, tween, teen - that should already be in the description), copyright/print date or circa (if you don't know the print date). It doesn't really matter what order you list these items in so long as you list them all.
![]() |
| Butterick 9492 |
- 1960's Butterick 4463, Girls Dress and Jacket, Size 5
- 1964 Simplicity 5854, Size 3, Boys Suit Pattern
- Toddlers' Yoked Dress & Slip, Butterick 9492, Size 1/2, c. 1968
- 50's Toddlers' Playsuit and Coat Simplicity 2094 Sz 2
- Rare Vintage Girls' Dress with Detachable Collar and Cuffs, Simplicity 1254, Size 10, c. 1955
- UNCUT Vintage 50's Girls Rockabilly Dress and Jacket, Advance 7706 Size 14
| Simplicity 2094 |
Spell out the manufacture's name whenever possible for search purposes. Some collectors only want Simplicity patterns. However the abbreviations B, S, M, or A will work in a pinch. Also remember that it is not necessary to include the words vintage or pattern in your listing title, those should be included in your tags. If you categorize or tag your listings correctly you will not need to create verbose listings to attract customers.
Sunday, February 27, 2011
My Pattern Stash - Butterick 6426 - Embroidered Layette Set
B6426 Circa 1960 Embroidered Layette Set
One size 1/2 only
This so sweet pintucked and embroidered layette set contains patterns for a long dress (21" length) and cap (A), short dress (18" length) (B), wrapper (C), sacque (D) nightgown with ties at bottom, neck and wrists (E), long slip (F), short slip (G) as well as booties (H) and a bib (I). Views A, B, F, H, & I are embroidered.
Suggested fabrics -
Dress & Cap: Batiste, Crepe de Chine, Nainsook.
Slip: Nainsook, Batiste, Lawn.
Nightgown, Wrapper and Sacque: Crepe, Albatross, Challis, Flannelette, Cambric.
Bib: Muslin, Batiste, Pique.
Booties: Slipper Satin, Crepe, Pique.
One of my most amazing finds, this rare vintage layette set printed pattern (circa 1960), is a favorite sewing project. My copy set me back about $9.00 the envelope is split along both sides and torn in several places. I can tell that this was also a favored project of a previous owner. Pattern piece #2 (the dress front) was shredded from repeated use of a pattern tracing wheel on the tissue and all the pieces have pin hole tears or other such damage from use. Very loved indeed.
To save and use this pattern I implemented my drastic measures procedure. I backed each pattern piece with Fusible Quilters 1" Grid. A good thing considering tracing the pintucks of the dress is what trashed the pattern to begin with. I know there is a collector cringing at what I have done but after this treatment the pattern will withstand several - perhaps dozens - of uses.
If you can pick up a copy of this pattern I highly recommend you do so. To date I have only found this pattern listed on three sites, e-Bay, Buggs Books and Comfort Kraft. The listing at Comfort Kraft is missing several pieces - if you would like copies of the missing pieces just contact me and I will make them for you.
One size 1/2 only
This so sweet pintucked and embroidered layette set contains patterns for a long dress (21" length) and cap (A), short dress (18" length) (B), wrapper (C), sacque (D) nightgown with ties at bottom, neck and wrists (E), long slip (F), short slip (G) as well as booties (H) and a bib (I). Views A, B, F, H, & I are embroidered.
Suggested fabrics -
Dress & Cap: Batiste, Crepe de Chine, Nainsook.
Slip: Nainsook, Batiste, Lawn.
Nightgown, Wrapper and Sacque: Crepe, Albatross, Challis, Flannelette, Cambric.
Bib: Muslin, Batiste, Pique.
Booties: Slipper Satin, Crepe, Pique.
One of my most amazing finds, this rare vintage layette set printed pattern (circa 1960), is a favorite sewing project. My copy set me back about $9.00 the envelope is split along both sides and torn in several places. I can tell that this was also a favored project of a previous owner. Pattern piece #2 (the dress front) was shredded from repeated use of a pattern tracing wheel on the tissue and all the pieces have pin hole tears or other such damage from use. Very loved indeed.
To save and use this pattern I implemented my drastic measures procedure. I backed each pattern piece with Fusible Quilters 1" Grid. A good thing considering tracing the pintucks of the dress is what trashed the pattern to begin with. I know there is a collector cringing at what I have done but after this treatment the pattern will withstand several - perhaps dozens - of uses.
If you can pick up a copy of this pattern I highly recommend you do so. To date I have only found this pattern listed on three sites, e-Bay, Buggs Books and Comfort Kraft. The listing at Comfort Kraft is missing several pieces - if you would like copies of the missing pieces just contact me and I will make them for you.
Tuesday, February 15, 2011
I Am Iron Man - Maxwell's Fingerless Mittens
| I Am Iron Man! |
Pattern is for a child's size M (increase or decrease base number in increments of two for size changes). This pattern is handed - left and right, you can make two lefties and adjust the bobble placement but once your child tries them on you'll see that adding the stitch at the end of the row creates a natural left thumb ease. To create the right hand mitten work the pattern back to front (or in this case outside to inside) tapestry style, this will make the stitches lean to the right and give the mittens two distinct variations and the right hand mitten the proper thumb ease.
Cuff
Using 6.5 MM crochet hook and red heavy worsted weight yarn chain 16. Join with sl for working in the round, being sure not to twist the chain, chain 1. Change to 5.5 MM hook.
Rounds 1 - 5: Begin in same st as joining, sc 16, sk last st, sl to join, ch 1.
Rounds 6: FPsc 16, sk last st, sl to join, ch 1
Rounds 7: BPsc 16 (in posts of round 6), sk last st sl to join, ch 1
Round 8: Working in loops of round 6 (if you turn your work inside out for this round picking up the loops are very easy), begin in same st as joining, sc 16, sk last st, sl to join, ch 1
Palm
Increase rows use the last stitch in the row that you have previously been skipping.
Round 11: Begin in same st as joining, sc 17, sl to join, ch 1
Round 10: Begin in same st as joining, sc 18, sl to join, ch 1
Round 11: Begin in same st as joining, sc 19, sl to join, ch 1
Round 12: Begin in same st as joining, sc 20, sl to join, ch 1
Round 13: Begin in same st as joining, sc 21, sl to join, ch 1
Round 14: Begin in same st as joining, sc 22, sl to join, ch 1
Round 15: Begin in same st as joining, sc 16, sk the last 6 sts, sl to join, ch 1
The increases at the end of the row have created a thumb ease.
Finishing
Round 16: Begin in same st as joining, sc 2, *3 dc in st below next sc, sk sc behind bobble, sc 1, repeat from * 3 more times (creates four bobbles/knuckle bumps), sc to end of round, sl to join, ch1
Round 17: Begin in same st as joining, sc 2, *gather bobble tops (pull up loop through each dc = 4 loops on hook, pull up loop), holding yarn behind hook, sc in skipped sc behind bobble, sc in next st, repeat from * 3 more times, sc to end of round, sl to join, finish and weave in ends. Adding a row or two to the thumb is optional at this point (on larger sizes desirable)
Right Hand Mitten
Repeat left hand pattern working from back to front, tapestry style. If you haven't yet crocheted anything using tapestry style, YOU WILL NEED TO PRACTICE before completing the right hand mitten.
Wednesday, January 12, 2011
A Word About Vintage Patterns
Vintage patterns are rare ephemeral treasures. Collectors look for specific qualities in the patterns they collect - the better preserved a pattern is, the more a collector is willing to pay and the less likely that collector is about to let it go to a non-collecting sewer. That being said it is far more affordable to purchase a vintage pattern whose envelope is torn and pattern tissues cut and marked than it is to purchase one that is uncut with factory folds in a pristine envelope. But if you must have it - YOU MUST HAVE IT! I have been known to splurge up to $35 for a rare, in excellent condition vintage pattern. In order to keep these patterns in collector quality condition I have developed several ways to preserve them while still getting use out of them.
There are several ways to "use" your vintage patterns while protecting them from degradation. The first way to save and use a pattern is a technique I reserve for patterns than have been severely used, abused, or neglected and will never again be considered of collectible quality. This process is also particularly useful if you are planing on using the pattern multiple times.
Begin by pressing your pattern tissue with your iron set to a low heat no steam setting (if you haven't learned this the hard way already, steam will shrink your pattern tissue). When the creases and crinkles are gone, set each piece aside on a flat surface until all your pieces are pressed. Then using the thinnest fusible interfacing you can find, adhere your pattern pieces to the interfacing. I prefer Pellon Quilters 1" Grid because using the grid allows me to resize a pattern as needed (something to talk about another day).
To do this simply lay your interfacing out on your ironing surface fusible side up. Adhere your pattern pieces right side up by aligning the straight of grain marker with one of the grid lines. Tack the pattern in place by using the tip of your heated iron (set to heat appropriate for the fusible interfacing) on the corners for a few seconds being careful not to allow iron plate to come into direct contact with the interfacing. When the pattern is tacked trim the interfacing to the edge of the pattern piece. To complete the fusing process press the pattern one section at a time. DO NOT slide the iron around on the pattern as this will cause it to wrinkle.
Another way to use your vintage patterns - those of a collectible quality - while preserving their integrity, is copying. To copy you can use most any kind of paper, butcher paper (which can come on very wide rolls), parchment paper, blank pattern paper (can be quite expensive), wrapping tissue or even regular old bond paper put together with a little tape. Use what you have on hand - don't spend a fortune if you are only going to use the pattern once. If you plan on using the pattern multiple times or will need to make alterations for fit then buy the best - pattern tracing material. This material is a very durable, non woven, semi transparent fabric that can be sewn together for fitting and altered by placing marks on the material.
Lay out your uncut pattern and press. At this point (depending on what kind of tracing material you are using) you will either lay your pattern paper on a clean light colored surface or light box and place the tracing paper or material over the top of the pattern. Take care to make sure there are no winkles in either pattern or paper then weight it down (I like to use my quilting rulers for this) and simply trace the pattern marks with a fine point, felt tip, marker or soft point pencil. If you are using pattern tissue or wrapping tissue be cautious about pressing too hard - the paper is delicate and tears easily. Check your marks frequently to be sure the pattern pieces aren't shifting during tracing. Be sure to copy all notes and markings pertinent to your sewing project. Coping is a wonderful option that allows you to use a pattern over and over leaving the original in its' uncut state, and while the process is time consuming, it is well worth the effort!
Want to give pattern tracing material try? Check out my shop listings for 5 yard increments and by the yard special orders http://www.etsy.com/shop/PiePoe
There are several ways to "use" your vintage patterns while protecting them from degradation. The first way to save and use a pattern is a technique I reserve for patterns than have been severely used, abused, or neglected and will never again be considered of collectible quality. This process is also particularly useful if you are planing on using the pattern multiple times.
Begin by pressing your pattern tissue with your iron set to a low heat no steam setting (if you haven't learned this the hard way already, steam will shrink your pattern tissue). When the creases and crinkles are gone, set each piece aside on a flat surface until all your pieces are pressed. Then using the thinnest fusible interfacing you can find, adhere your pattern pieces to the interfacing. I prefer Pellon Quilters 1" Grid because using the grid allows me to resize a pattern as needed (something to talk about another day).
To do this simply lay your interfacing out on your ironing surface fusible side up. Adhere your pattern pieces right side up by aligning the straight of grain marker with one of the grid lines. Tack the pattern in place by using the tip of your heated iron (set to heat appropriate for the fusible interfacing) on the corners for a few seconds being careful not to allow iron plate to come into direct contact with the interfacing. When the pattern is tacked trim the interfacing to the edge of the pattern piece. To complete the fusing process press the pattern one section at a time. DO NOT slide the iron around on the pattern as this will cause it to wrinkle.
Lay out your uncut pattern and press. At this point (depending on what kind of tracing material you are using) you will either lay your pattern paper on a clean light colored surface or light box and place the tracing paper or material over the top of the pattern. Take care to make sure there are no winkles in either pattern or paper then weight it down (I like to use my quilting rulers for this) and simply trace the pattern marks with a fine point, felt tip, marker or soft point pencil. If you are using pattern tissue or wrapping tissue be cautious about pressing too hard - the paper is delicate and tears easily. Check your marks frequently to be sure the pattern pieces aren't shifting during tracing. Be sure to copy all notes and markings pertinent to your sewing project. Coping is a wonderful option that allows you to use a pattern over and over leaving the original in its' uncut state, and while the process is time consuming, it is well worth the effort!
Want to give pattern tracing material try? Check out my shop listings for 5 yard increments and by the yard special orders http://www.etsy.com/shop/PiePoe
Wednesday, January 5, 2011
Something a Little Different
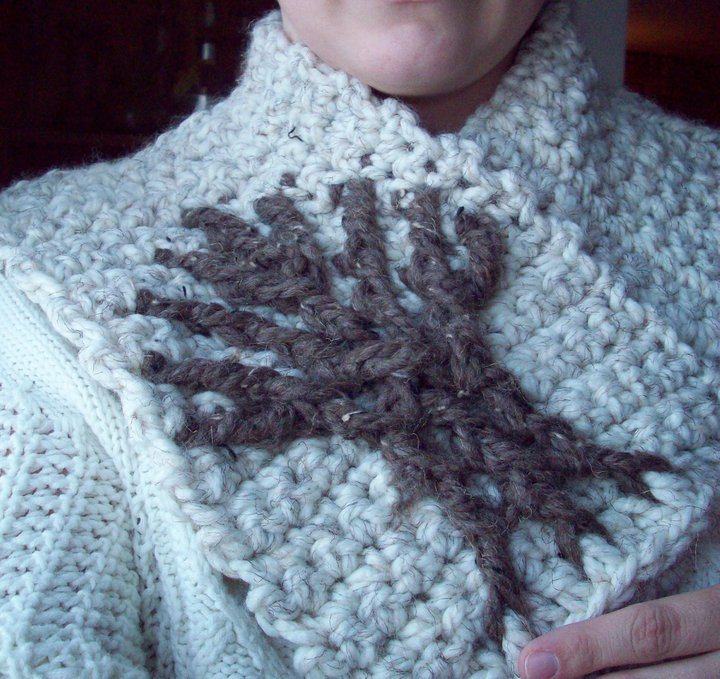
Tree of Life Cowl
Designed by Susannah Reynolds Duelfer
Skill Level: Advanced Beginner (working this pattern in two colors is an Intermediate level skill).
Materials: 7.00 oz./200 g (130 yd/119 m) Super Bulky Yarn (pictured using 2 skeins Lion Brand Wool-Ease Thick & Quick in Oatmeal and a 20 yard remnant of Barley), N-15 (10 mm) hook.
Gauge: 7 sc and 8 rows = 4" (10 cm) on size N-15 (10 mm) hook
STITCH EXPLANATION:
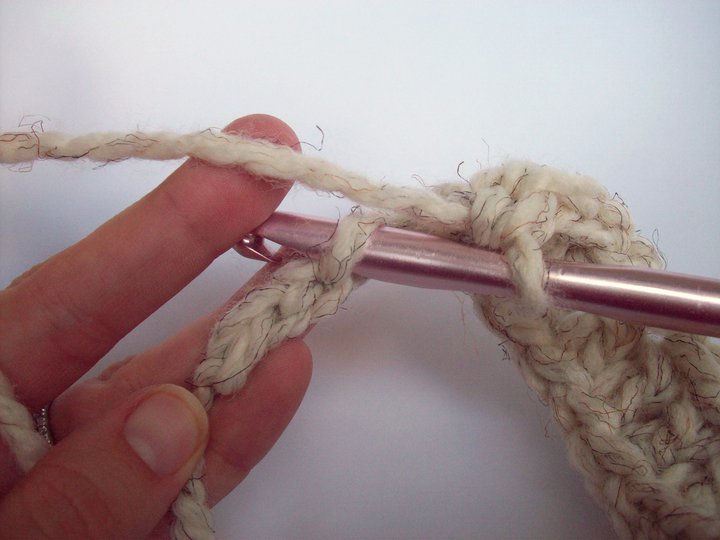
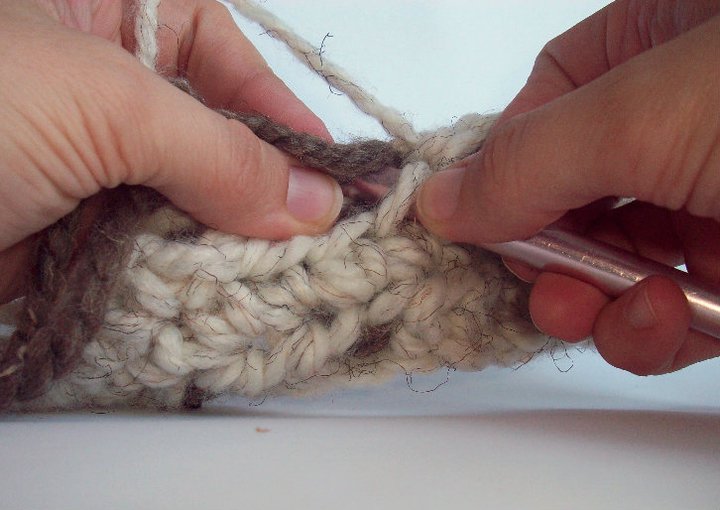
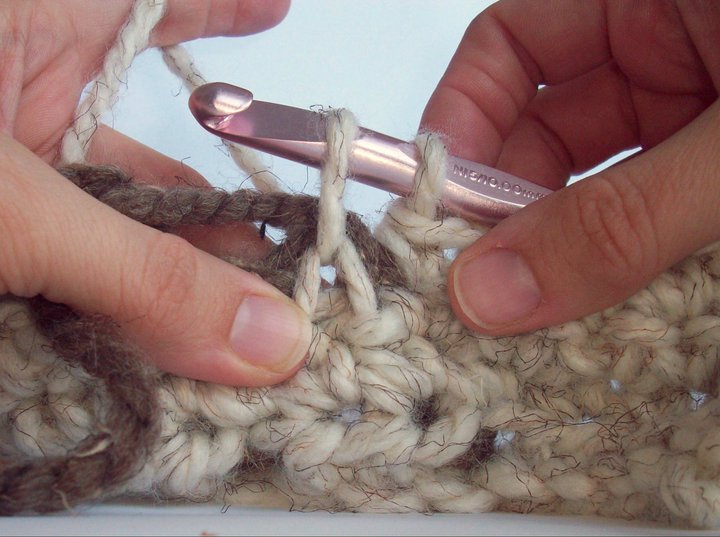
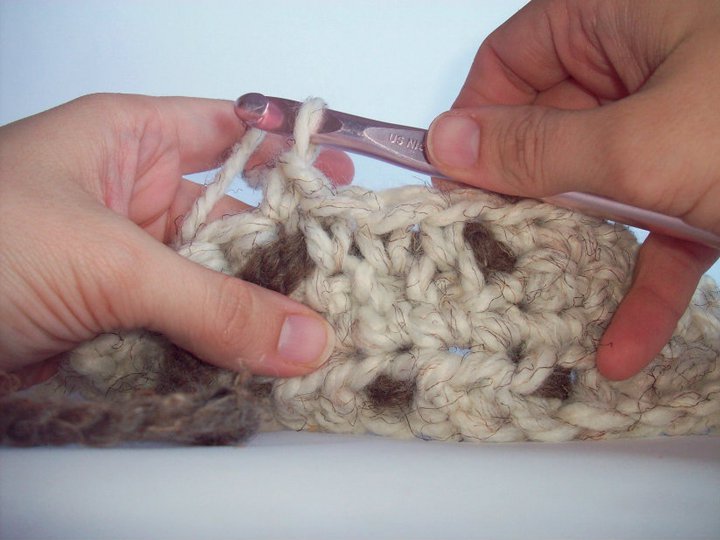
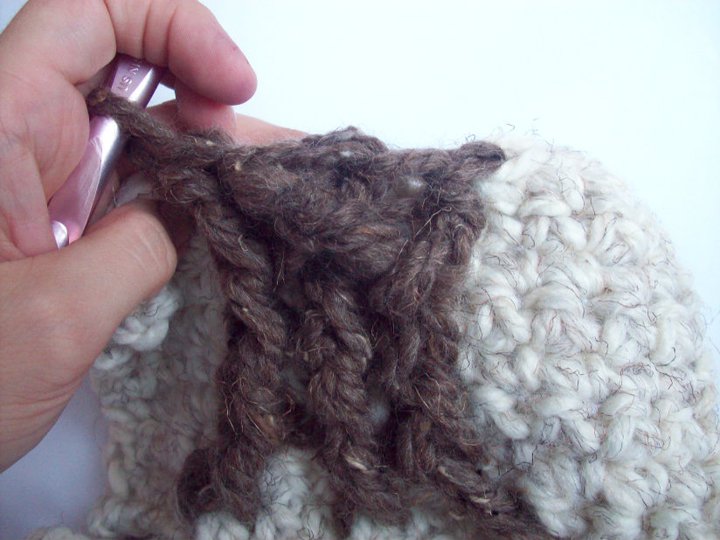
- FPdc (front post double crochet) Yo, insert hook from front to back then to front, going around the post of st, draw up a loop, (yo and draw through 2 loops on hook) twice. Skip st behind the FPDC.
- FPtr (front post triple crochet) Yo twice, insert hook from front to back then to front, going around the post of st, draw up a loop, (yo and draw through 2 loops on hook) 3 times. Skip st behind the FPTR.
- Reinforcing your FPdc's - it is necessary to reinforce your FPdc's to give the piece good cohesion, to do this capture the front loop of the skipped sc on the hook before you pull the yarn through the FPdc sts.
NOTES:
- Front post sts are worked on odd-numbered rows (RS).
- Always sk the sc behind a front post st.
- Even numbered rows are always worked in sc.
- Reinforce your FPdc's to give the piece good cohesion.
- Work the cowl/scarf from the roots of the tree up.
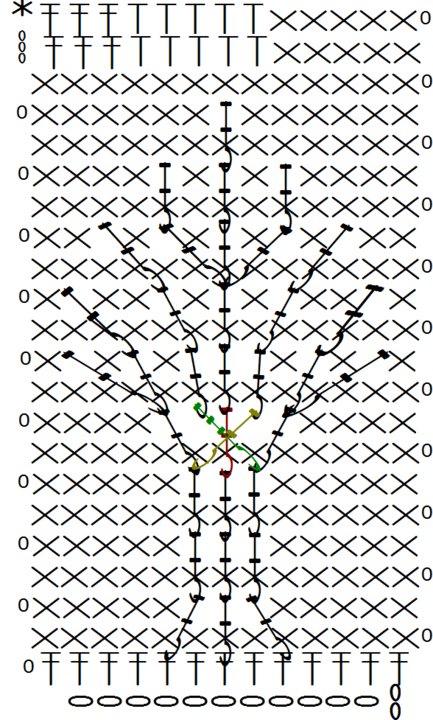
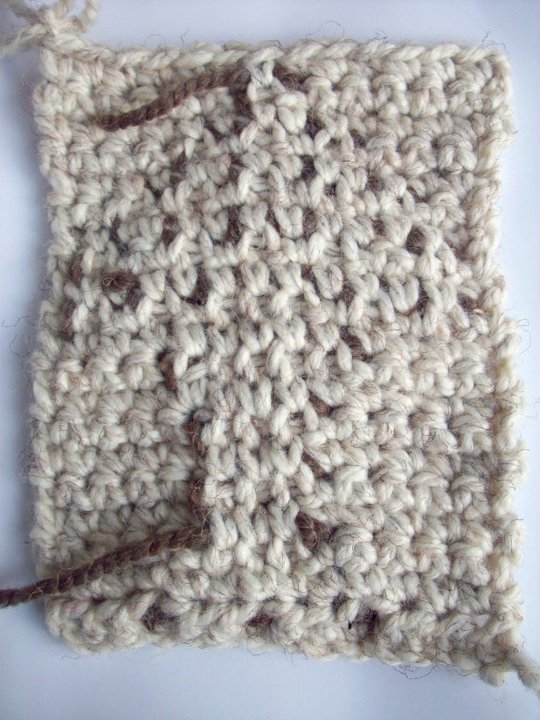
Row 1: ch 16, dc in 4th ch from hook (TIP- crochet along the back of the chain to give your work a finished look), dc in each st until end of row (13 dc), ch 1 turn.
Row 2: sc in each st until end of row (13 sc), ch1 turn.
Row 3: sc in each of the next 5 sts, FPdc around the 4th dc in row 1, FPdc around the 7th dc in row 1, FPdc around the 10th dc in row 1, skip the 3 sc behind posts sts just made, sc in next 5 sts, ch 1 turn (11 sts).
Row 4: sc in each st until end of row remembering to reinforce your FPdc's (13 sc), ch 1 turn.
Row 5: sc in each of the next 5 sts, FPdc around the corresponding FPdc in Row 3, repeat for next 2 sts (3 FPdc), skip the 3 sc behind posts sts just made, sc in next 5 sts, ch 1 turn (13 sts).
Row 6: sc in each st until end of row remembering to reinforce your FPdc's (13 sc), ch 1 turn.
Row 7: sc in each of the next 5 sts, FPdc around the corresponding FPdc in Row 3, repeat for next 2 sts (3 FPdc), skip the 3 sc behind posts sts just made, sc in next 5 sts, ch 1 turn (13 sts).
Row 8: sc in each st until end of row remembering to reinforce your FPdc's (13 sc), ch 1 turn.
Row 9: sc in each of the next 4 sts, remembering to sk all sc behind FPdc’s; FPdc around the 1st FPdc in row 7, FPdc around the 3rd FPdc in row 7, going underneath the FPdc just made FPdc around the 2nd FPd, going over the two center FPdc’s just crochet and under the 1st FPdc in row 9 - FPtc around the 1st FPdc in row 7, FPdc around the 3rd FPdc in row 7, sk the sc behind FPdc’s, sc in next 4 sts, ch 1 turn (13 sts).
Row10: sc in each st until end of row remembering to reinforce your FPdc's (13 sc), ch 1 turn.
Row 11: sc in 1st st, FPtc around the 1st FPdc in Row 9, sk the sc behind FPtc, sc in next st, FPdc around the 1st FPdc in row 9 over the top of the FPtc, sk the sc behind FPdc, sc in next st, FPdc around the 2nd FPdc in row 9, FPdc around the 3rd (center) FPdc, FPdc around the FPtc in row 9, sk the 3 sc behind FPdc's, sc in next st, FPdc around the last FPdc in row 9, sk the sc behind FPdc, sc in next st, FPtc around the last FPdc in row 9 under the previous FPdc, ch 1 turn (13 sts).
Row 12: sc in each st until end of row remembering to reinforce your FPdc's (13 sc), ch 1 turn.
Row 13: sc in 1st st, FPdc around the 1st FPdc (2nd post st) in row 11, sk sc behind FPdc, sc in next 2 sc, FPdc around the 2nd FPdc (3rd post st) in row 11, sk the sc behind FPdc, sc in next st, FPdc around the 3rd FPdc (center) in row 11, sk the sc behind FPdc, sc in next st, FPdc round the 4th FPdc in row 11, sk the sc behind FPdc, sc in next 2 sts, FPdc around the 5th FPdc in row 11, sk the sc behind FPdc, sc in next st, ch 1 turn (13 sts).
Row 14: sc in each st until end of row remembering to reinforce your FPdc's (13 sc), ch 1 turn.
Row 15:sc in each of the next 2 sts, FPdc around the 2nd FPdc in row 13, sk the sc behind FPdc, sc in next 2 sts, 3FPdc around the 3rd FPdc in row 13, sk the 3 sc behind the FPdc’s, sc in next 2 sts, FPdc around the 4th FPdc in row 13, sk the sc behind FPdc, sc in next 2 sts, ch 1 turn (13 sts).
Row 16: sc in each st until end of row remembering to reinforce your FPdc's (13 sc), ch 1 turn.
Row 17: sc in each of the next 4 sts, FPdc around the 2nd FPdc in row 15, sk the sc behind FPdc, sc in next st, FPdc around 3rd FPdc in row 15, sk the sc behind FPdc, sc in next st, FPdc around the 4th FPdc in row 15, sk the sc behind FPdc, sc in next 4 sts, ch 1 turn (13 sts).
Row 18: sc in each st until end of row remembering to reinforce your FPdc's (13 sc), ch 1 turn.
Row: 19: sc in each of the next 6 st, FPdc around the center FPdc of row 17, sk the sc behind FPdc, sc in each of the next 6 st, ch 3 turn (13 sts).
BACK FRONT
Body: *dc in each of the 1st 3 sts, hdc in the each of the next 5 sts, sc in each of the last 5 sts, ch 1 turn (13 sts) sc in each of the 1st 5 sts, hdc in each of the next 5 sts, dc in each of the last three sts, ch 3 turn (13 sts). Repeat from * until desired length of curve is achieved.
Finishing: sc in each of the the 13 sts for 20 rows.
StitchinCrochet symbol font created by Adriana E. Hernandez and published by Adriprints. Available for purchase at http://new.myfonts.com/fonts/adriprints/stitchin/.
As a courtesy to the designer please do not copy and distribute this pattern without permission. You are free to make and sell the product of this design but the creator asks that you acknowledge that the pattern is not your own. Thank you. susannahsstash@gmail.com
Subscribe to:
Posts (Atom)